I looooove Google Search Console. It is an essential SEO tool I use daily to help improve the SEO results for our clients. Do you know what the best bit about it is? It’s completely free!
Google designed this free tool to help website owners better understand how their websites perform in the search results and how to improve your website for organic search traffic. Or using Google’s own words, it helps:
“Make your site shine in Google Search results”
I find that either a lot of people don’t know about it, have no idea where to start with it or simply don’t understand the importance of it. Therefore, I am here to tell you that if you want to improve your SEO, then this tool is only going to make it easier for you to obtain organic search growth.
So let’s dig in, here are 5 ways you should be using Google Search Console:
1. Set up Google Search Console
This is a no brainer. In order to use it and to get value from it, you need to set it up and verify your account. Here is a quick run-through on how you can do this:
- Go to search.google.com/search-console/about and sign in (you’ll need to use an email address attached to a Google account, I would recommend using the same email address you use to login to Google Analytics and any other Google properties)
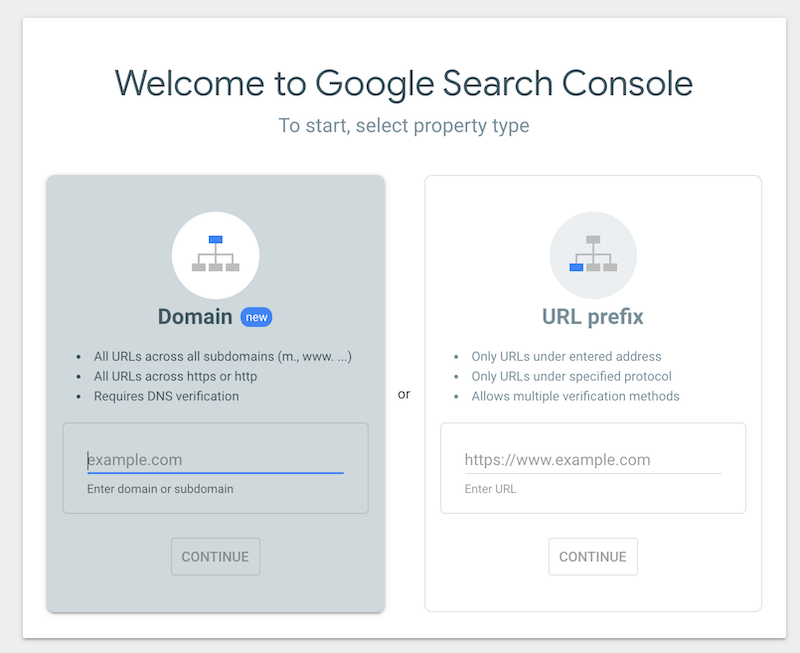
- Unless you need to verify multiple versions of your site, I would recommend choosing the ‘URL prefix’ option as shown below on the right-hand side:
- Next up, add your URL to the box just above where it says ‘Enter URL’ and press the continue button.
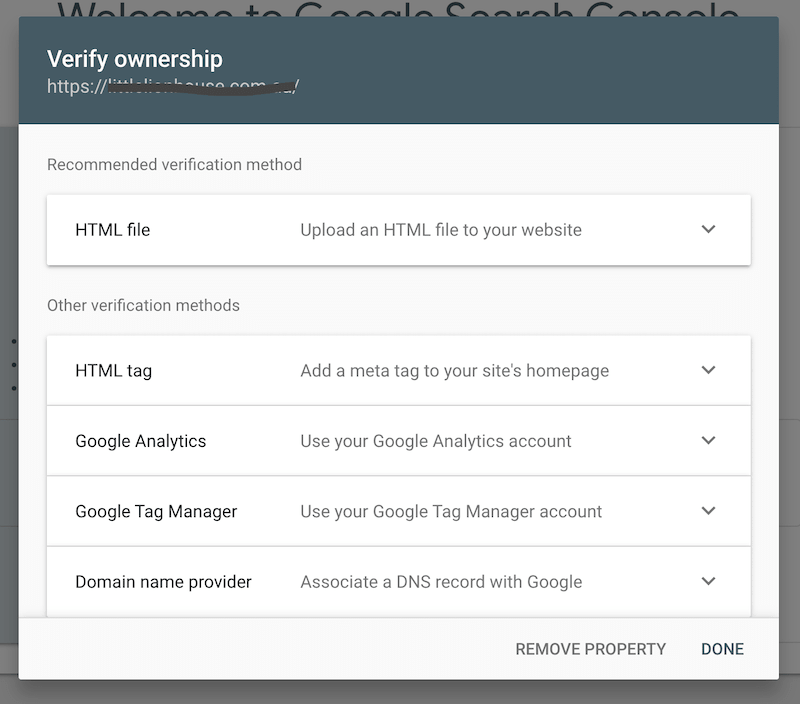
- Google will then see if they can automatically verify you – this is typically pretty straightforward if you are logged into your Google account with the same email address that has access to your Google Analytics and/or Google Tag Manager account.
If you run into hurdles and struggle to verify, I would recommend:
- Ensuring your email address has access to your Google Analytics/Google Tag Manager accounts and try again
- Looking to use the HTML tag to verify, how you do this will depend on your CMS e.g. here are some links for; Shopify, WordPress using Yoast and Wix
- For Squarespace website owners, simply follow these steps
2. Add your XML sitemap
Once you have your account set up, the next thing you will want to do is add your XML sitemap. This helps tell Google what pages are on your website so that Google can find them easily and index them. For most sites, if you add sitemap.xml onto the end of your URL, it should take you to your sitemap. For example, when I type in grandcrudigital.com.au/sitemap.xml it takes me here.
What I then want you to do is find the Sitemaps option on the left-hand menu and add your sitemap URL and click the submit button.
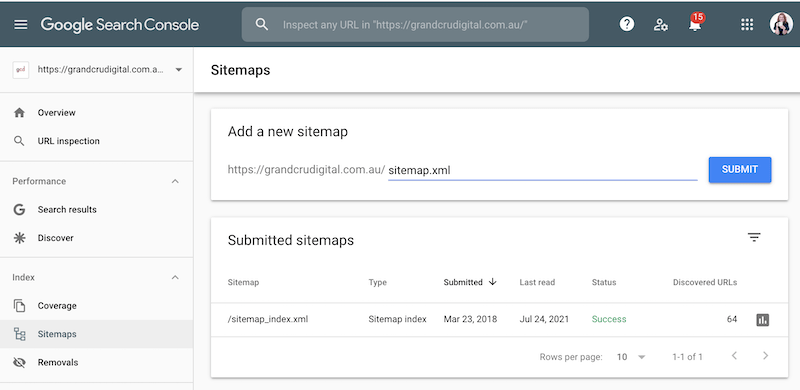
And voila, your sitemap is added and you’ve ‘asked’ Google to crawl and index your web pages.
Your XML sitemap updates automatically as you add and remove new pages and posts from your website, so this is a one off task.
3. Review your performance on the search results
The ‘Search results’ report which is under the Performance section is my most favourite. It is the report which tells you what queries (aka keywords) your website is showing on the search results for, how many clicks you get, what the average click-through rate is and an average position.
I use this report regularly, I would be in it every other day, if not every day.
I mainly use it for optimising existing pages. I take a look at what a site is ranking for and look into what I can do to improve either a) the keywords click-through rate (which means focusing on improving the search results – metadata, rich result features, etc) or b) the queries average position.
Within this report, you can filter by specific search queries, pages on your website, different date ranges, country, device, etc. Seriously there is a wealth of information in this one report and if you’re going to master anything, it would be this report in my opinion.
I particularly like the Search Appearance report, especially if you are adding schema and/or things like videos to your site:
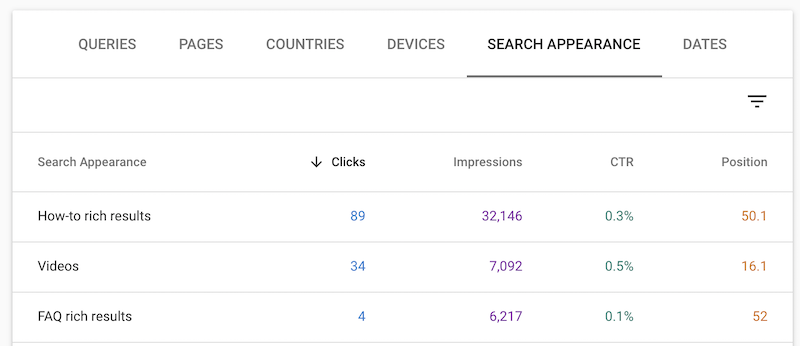
Once you are within the above-pictured report, you can then click through on any of the rows and see what exact pages are showing those special features alongside what keywords are triggering them. I don’t know about you, but that gets the data-loving geek in me very excited!
Plus you can use the new Search Console Insights report too – which has some fantastic information on new pages, trending pages, trending keywords, backlinks, etc. In the below video I talk you through the report:
4. Fix issues on your site
We all want to know Google’s secret sauce right, and we all want to know how we can improve our sites to make them more SEO friendly. Google Search Console is the closest thing you are going to get to this, because Google is giving you information on potential issues that might be holding YOUR site back from ranking higher.
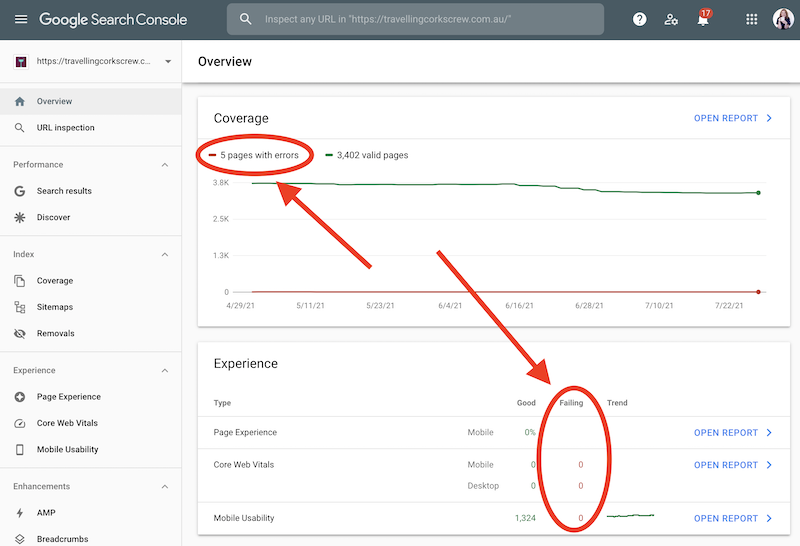
When you first login to your account, you’ll be brought to the Overview tab, and on this tab, you’ll be able to get a quick idea if there are any issues you need to look at as they will be highlighted in red. You can then click through to the issues and learn more about them.
Issues can range from broken 404 pages (you will want to fix these so they work again or set up 301 redirects for them) to mobile usability issues and more. Not all issues are vital to be fixed however, understanding why Google is pinpointing certain things is worthwhile understanding.
For example I sometimes get issues popping up because I have used the noindex tag on some pages. Most the time, I have done this for a specific reason – so it is not actually an issue.
My top tip is to firstly validate any issues and then after a few days if they come back not successfully fixed, then you can look into the issue. GSC typically picks up on a lot of things that aren’t actually issues – most of the time it’s because they couldn’t properly crawl a page. This may be due to the site being temporarily down for maintenance or something of the like.
5. Use the URL Inspection tool
Part of my process of creating and optimising a new blog post or page on a website is once it’s live I input it in the URL Inspection tool in Google Search Console. I do this for 2 reasons:
- To help Google find, crawl and index it sooner (the quicker it shows up on the search results, the sooner we can get organic search traffic finding it)
- To check to see if there are any potential indexing issues
It’s a great habit to get into when you add a new page or blog post to your website and it literally takes 2 minutes!

So there you have it. These are the top 5 ways, as an SEO Specialist, I use Google Search Console. I hope you have found some nuggets of useful information in the above. Please don’t hesitate to contact us if you have any questions.

