Recently on my Instagram Story I ran a poll asking if you have Google Tag Manager on your website and if not, would you like to learn. The answer was a resounding yes, which is probably why you are here right now reading this post. There are a number of guides online about how to set up Google Tag Manager however many people have come to me and said they’re hard to understand and follow.
Hopefully this guide is not one of those and instead makes your life as a business owner and online marketer easier.

What is Google Tag Manager?
Google Tag Manager (GTM) is a free tool by Google which helps you add tracking codes to your website. You can add tracking codes such as:
- Google Analytics
- Facebook Pixel
- Event tracking to track outbound clicks such as clicks on phone numbers, email addresses, on buttons, links to other websites, and more!
- Track interactions with videos on your website (do people watch 25,50,75 or 100% of your videos?)
- Track scroll depth (do people scroll right to the bottom of your page, or only halfway?)
- Hotjar
- Google Optimize
- Google Ads website call tracking and conversion tracking
And so much more! If it’s a tracking code you need to add to your website or you want to track a specific user interaction, GTM will be able to do it.
Once you have added the initial GTM code to your site (or your developer has done it for you), you won’t need to go into the code, or use different plugins to add tracking codes to your website each time.
Why should I use Google Tag Manager?
Firstly, it’s free, which is a good thing for a small business owner. Secondly, it helps keep your website code tidy, and loading as fast as possible.
As all your tracking codes now sit in the one GTM ‘container’ – it means you’re not bulking up your website with necessary code and/or plugins. Which all helps with a successful SEO strategy.
Plus what I really love about GTM, is that most people can use it without high tech knowledge. This means less time/money involved in completing some tasks, which is always good in my opinion.
PS: If you’re not using tracking codes, here’s why you should be using Google Analytics especially >>
How do I set up Google Tag Manager?
Hopefully now you understand what a great tool GTM is and you’re keen to get started and add it to your website. If you have any questions regarding the below steps on how to set up Google Tag Manager, just let me know.
1. Create a Google Tag Manager account
To set up your account, head to the Google Tag Manager website and click the ‘Start for free’ button and follow the prompts to add your website URL and you’ll want to set it up as a ‘Web’ property.

2. Install the Google Tag Manager code on your website
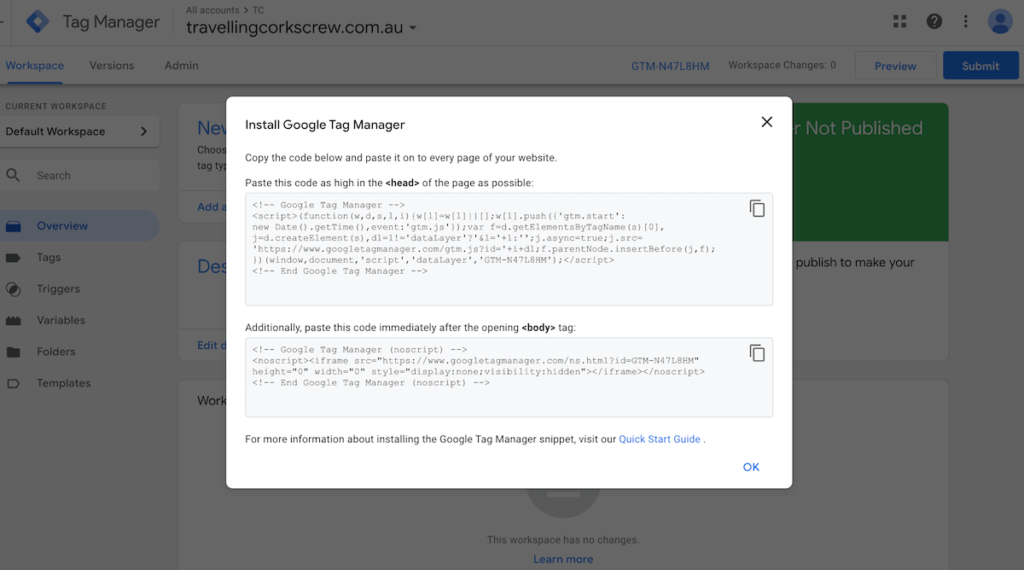
Next you’ll need to add the Google Tag Manager code to your website. It’s important to put it in the sections mentioned otherwise you may get errors and your tracking codes may not work accurately.
How you add the codes differs for different websites and different theme builders. So my best advice is to head to Google and search for [your CMS/theme builder] + [Google Tag Manager]. E.g. Shopify Google Tag Manager. Or alternatively, ask your web developer.
Here are some links to get you started:
• Install Google Tag Manager on a Shopify Website
• Add Google Tag Manager to your Divi Theme
If you can avoid a plugin to add it, and can add it to those specific sections mentioned (as close to the opening <head> tag as possible and immediately after the opening <body> tag) – you’ll have no problems down the track

3. Add your Google Analytics tracking code to Google Tag Manager
Next up, you want to add the Google Analytics tag to your GTM container (unless you have. Shopify website, please see their note about this here). What you want to do is head to your GTM dashboard and go to the ‘Tags’ section.
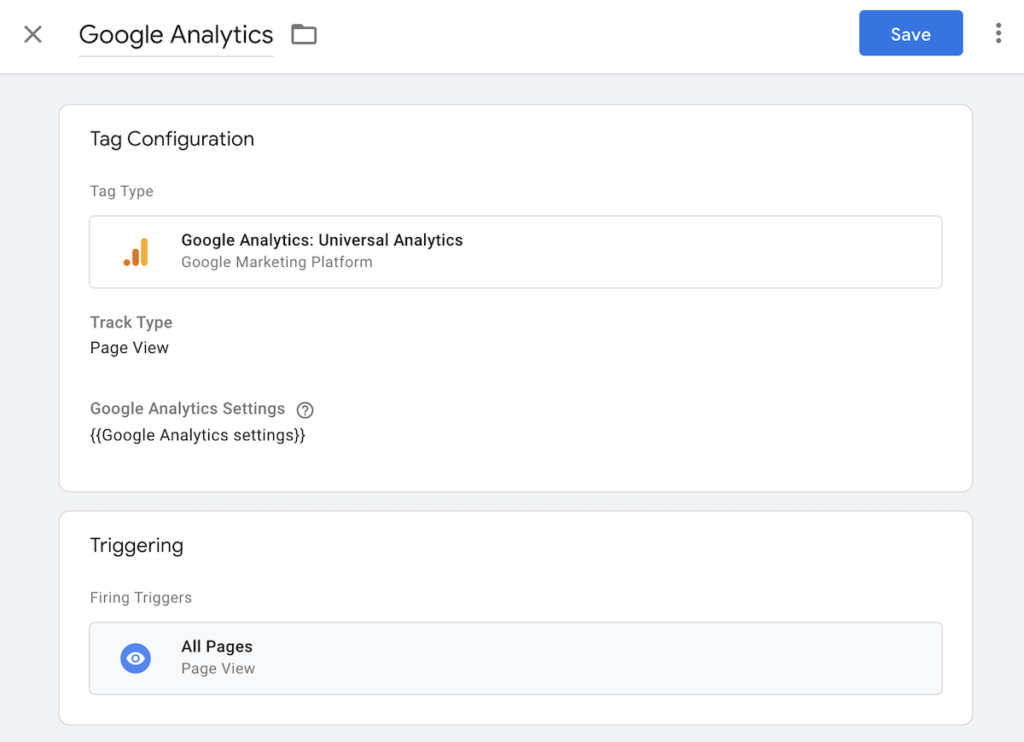
Once you’re in the Tags section, click ‘New’ and title your tag ‘Google Analytics’.
Next, hover over the Tag Configuration section, click on the pencil and choose the ‘Google Analytics: Universal Analytics’ option.
Now choose the ‘Select Settings Variable…’ and ‘New Variable’. You’ll also want to name this one Google Analytics and what you’ll do is drop in your Google Analytics Tracking ID. Then click ‘Save’.
In the ‘Triggering’ section, click the pencil and choose the trigger ‘All Pages’. Save the Tag and then all you need to do is hit the blue ‘Submit’ button in the top right-hand corner to publish it.
Pro Tip: Once you have your Google Analytics code in your GTM container, you will want to remove it from your website if you had it on there beforehand. Otherwise you will have your Google Analytics code on your website twice, which can cause issues + it defeats the purpose of keeping everything streamlined in GTM!

4. Test your tracking code is working in Google Analytics Real Time
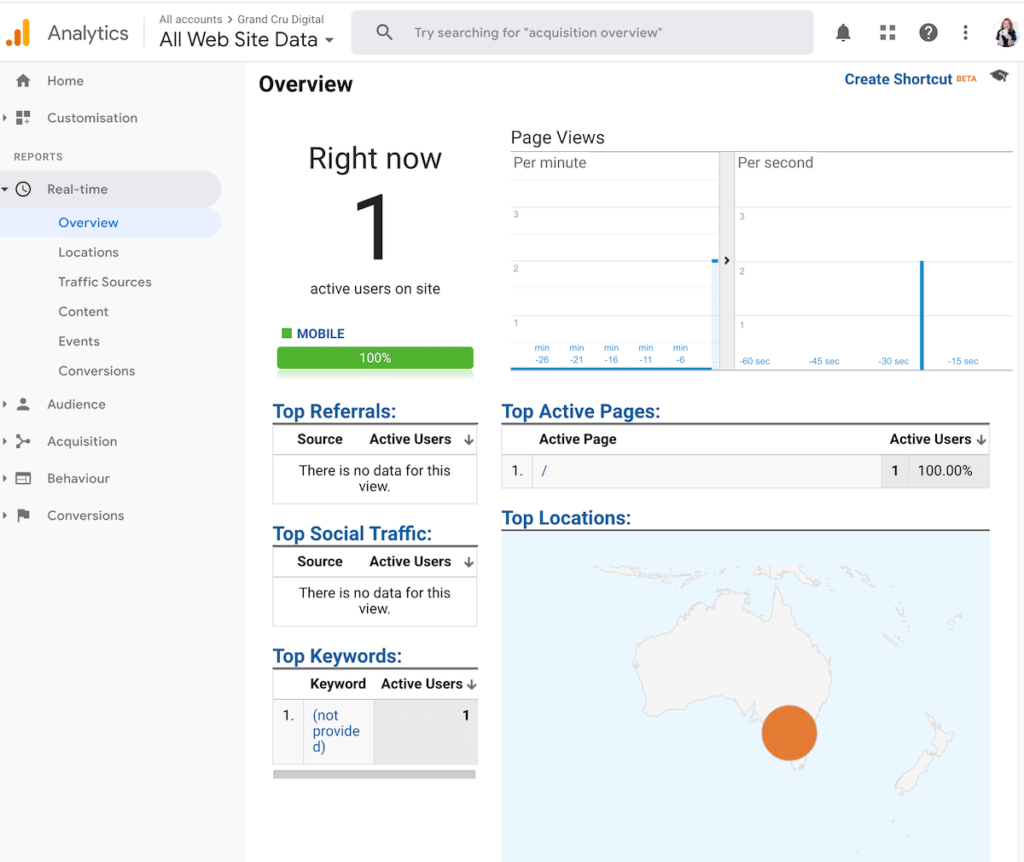
As with any tracking on your website, you will want to double check it is working properly. The best and easiest way to do this is to navigate to your website and open Google Analytics Real Time view and see if you can see yourself on the website.

5. Test your Google Tag Manager installation with Tag Assistant (by Google)
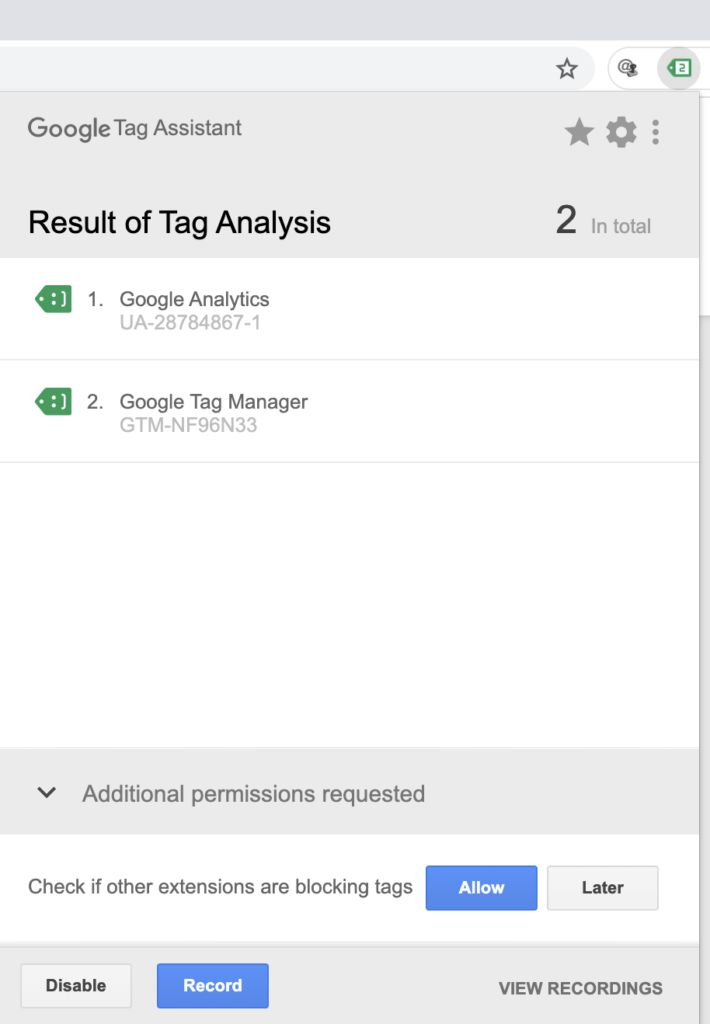
While we are testing things. I would also highly recommend checking that Google Tag Manager has been installed correctly and is not showing any errors. To do this, add the Tag Assistant (by Google) Chrome Extension.
Once done, navigate to your webpage, click on the extension and hit the ‘Enable’ button. Then once you refresh the page, you’ll see the analysis.

Congratulations! Google Tag Manager is now set up with your Google Analytics tracking code inside.
Now you can add any other tracking codes you wish. When you do this, just make sure you don’t double up any of your tracking codes. Once they are inside GTM and are working, remove the old code.
I am hoping this guide on how to add Google Tag Manager to your website has been helpful. If you’d like to learn how to add other tags or create tracking for outbound links, just let me know and help you get that set up too!


