
It’s true! The Google Analytics we know and love (Universal Analytics/GA3) is being replaced by GA4 in 2023. On July 1, 2023, Universal Analytics properties will stop processing new hits therefore if you want to continue using Google Analytics from July 2023 onwards then you need to set up GA4.
It’s also important to note that your historical GA3 data will only be available for a set amount of time after July, at this stage Google is saying approximately 6 months.
I am not going to lie, GA4 is a whole new ball game. Here at GCD we set up GA4 properties for all our clients in 2021 as we wanted to see how it worked, and it’s safe to say, it is quite different to the Google Analytics we currently use.
We have been busy learning about GA4 in the GCD office via various online resources, including the Loves Data GA4 Mini-Course, as we want to learn as much about this new analytics as possible.
If you haven’t yet set up GA4, now is the time to do it and to start collecting data. Even if you don’t fully understand it, by doing a basic setup, it can help you prepare for next year.
Therefore this post aims to take you through the basic set-up steps, so you can create your GA4 property and start the flow of data. So let’s dig in:
1. Use the GA4 setup assistant
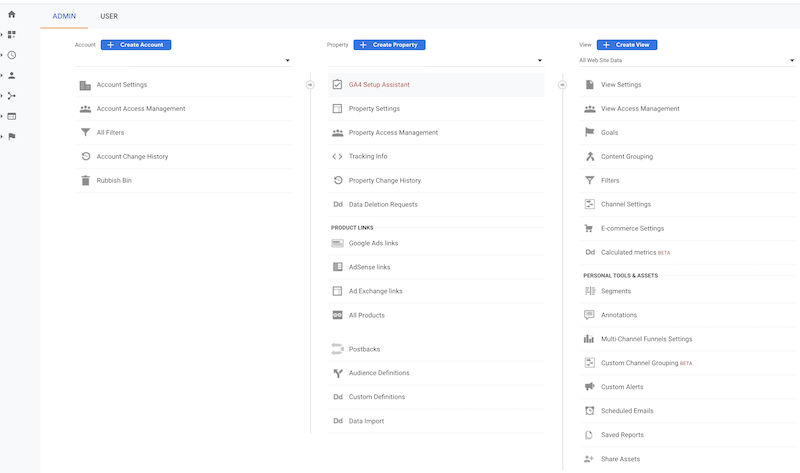
Firstly you will want to login to your Google Analytics Tab and navigate to the Admin tab. Within this menu, under the Create Property tab, you will see the GA4 Setup Assistant option.
2. Follow the steps to create a new GA4 property
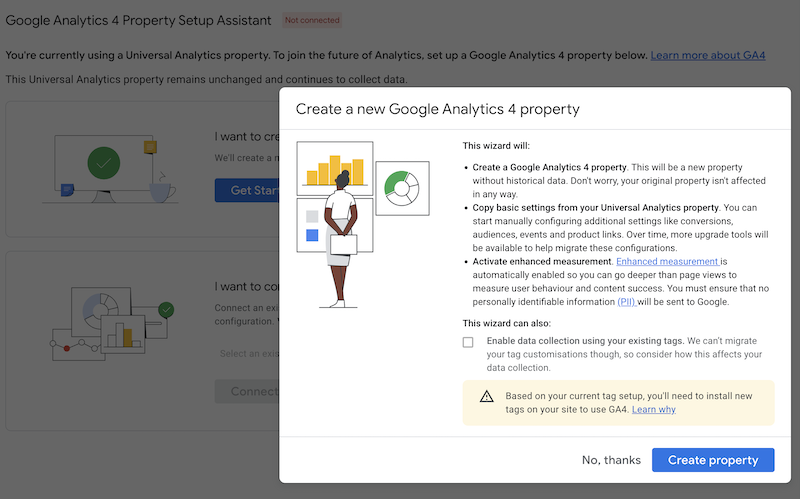
Once you click through to the setup assistant you should be able to choose to ‘create a new Google Analytics 4 property’.
3. Add the GA4 tag to your website
The last step to set up the basics of GA4 on your website is to add the tracking code to your website. How you do this will greatly depend on the type of website you currently have (e.g. WordPress, Shopify, Wix, etc) and how you currently add tracking tags to your website (e.g. directly via the code, Google Tag Manager, etc).
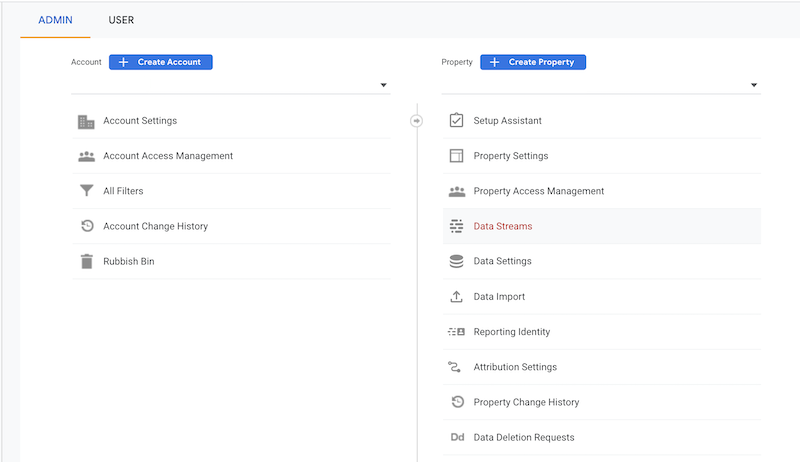
In order to find your GA4 tag, you will need to go into the Admin section of your GA4 property and click on Data Streams:
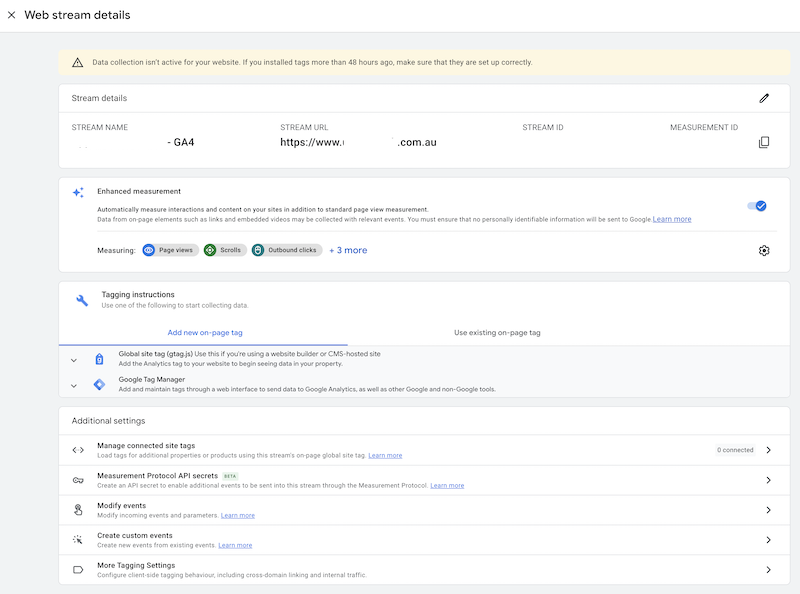
Next click on the little arrow to the righthand side of the Data Stream already created:

Once clicked, you will then be given all the info you need to add your new measurement ID to your website.
Depending on how your current Google Analytics code is added to the site, you might simply be able to connect your current GA3 property to your GA4 property by doing the below:
- In a separate window, open the Google Analytics 3 property that controls your on-page tag.
- Go to Admin > Tracking Info > Tracking Code.
- Click Connected Site Tags under the global site tag (gtag.js).
- Connect your Measurement ID.
How to add GA4 tracking code via Google Tag Manager
As I am a big fan of Google Tag Manager, the majority of the GCD clients have this tag management system installed, which means I have had to set up a special GA4 tag in Google Tag Manager for them.
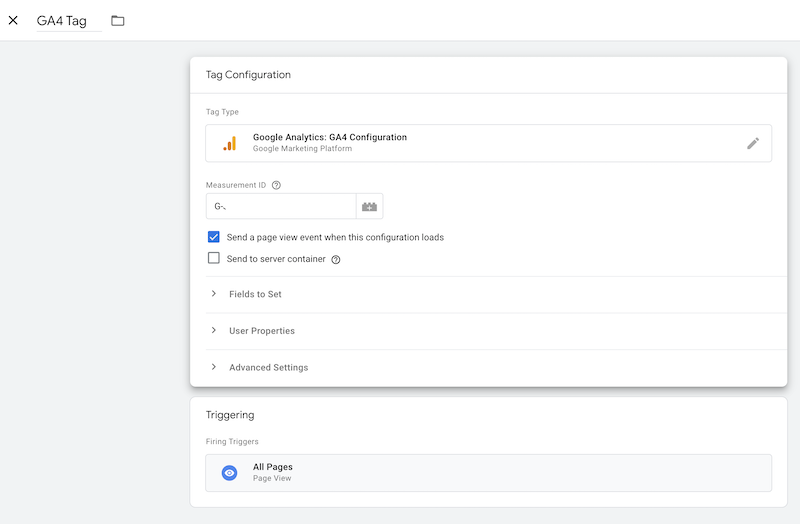
The process to set up your GA4 tag in Google Tag Manager is fairly straightforward:
- Open the Google Tag Manager container that’s implemented on your page.
- Click Tags > New.
- Click Tag Configuration and select GA4 Configuration.
- Enter your Measurement ID.
- Select to trigger the tag on All Pages.
- Save and publish your tag configuration.
Here is what my tags look like:
4. Check data is flowing through
Once you believe you have added the measurement ID, you can then either leave it and come back later to check that data is populating. Or you can go into the real-time report to see if data is populating:
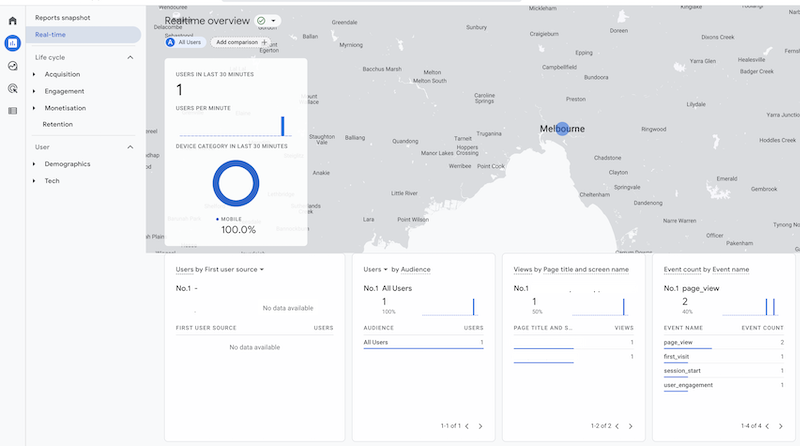
If you are seeing data like the above and not just zero’s – congratulations, you have successfully completed a basic GA4 set-up! If you aren’t seeing any data, revisit the Data Streams section and the implementation of your GA4 tag.
If you cannot work out why you’re not seeing data, talk to your SEO Specialist or Web Developer and they should be able to help.
There is a lot more to GA4 than what we have outlined above however, we wanted to put together some super simple steps on getting your GA4 property set up and pulling in data. Stay tuned for more details on how to fine-tune your GA4 set-up over the coming months.
Further enhancements to set up GA4:
You can easily do the below from the GA4 setup assistant menu. I would encourage you to go through every item on the menu at some point and set everything up based on your website’s needs. However, a couple of quick enhancements you can do straight away with only a couple of clicks are:
- Activate Google Signals
- Import existing goals from your connected Universal Analytics property

Link your Google products
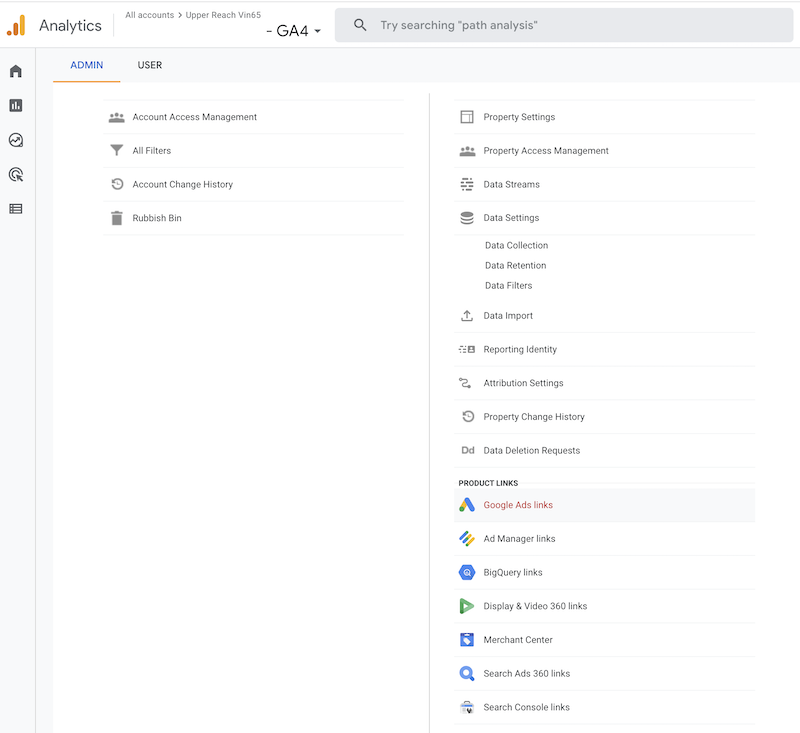
I would also encourage you to link any of your other Google products like Google Search Console (everyone should do this at a minimum) Google Ads and Google Merchant Centre, you can do this by clicking on these from the Admin menu and following the instructions:
Extend user and event data retention
In the admin settings of your account you can change the retention period for data you send that is associated with cookies, user identifiers or advertising identifiers. I would recommend changing this from the default of 2 months to 14 months (the maximum allowed).
You can do this by going to your GA4 Settings > Data Settings > Data Retention.
Exclude Internal Traffic Filter
Like with your current Google Analytics set up, it’s worth while filtering out your own usage of your website, so it doesn’t skew your data.
In order to filter out you and your employees usage of the website head to your GA4 Settings > Data Streams > Your Data Stream > More Tagging Settings > Define Internal Traffic
You can then filter out your traffic by IP address. This is easy enough to do from a corporate location, however I find if you work from home this isn’t as straightforward as you’ll have a dynamic IP address. Therefore it might be a better alternative to use a Chrome extension like Block Yourself From Analytics.
By doing the above it will give you further data to work with and analyse. Please bookmark this post and sign up to our email newsletter for further GA4 tips.


